
Table of Contents:
- Setting up a client machine for remote installation
- Adding client computers in remote desktop
- Setting the preferences you want to deploy
- Using Automatic workflow to deploy AirParrot 3
- Get specific finder items
- Copy items to computers
- Execute new UNIX Task
- Troubleshooting
AirParrot 3 can be mass deployed across a network using Apple Remote Desktop. Once you’ve set up the computer groups you want to deploy to in Apple Remote Desktop, the provided Automator workflow will allow you to mass deploy the software to these computers, complete with any customized preferences.
Setting up a client machine for remote installation
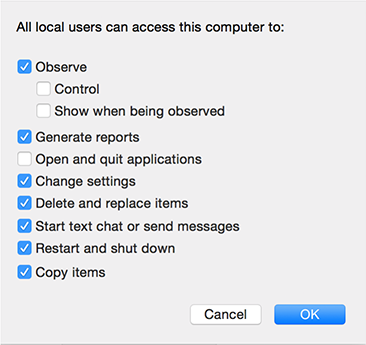
Before you can mass deploy AirParrot 3, you need to make sure that the computers you want to deploy to are configured for remote installation. Go to System Preferences, and then go to ‘Sharing’. Select ‘Remote Management’. You can then set the options for remote access.
Each client should have the below options selected:
Adding client computers in remote desktop
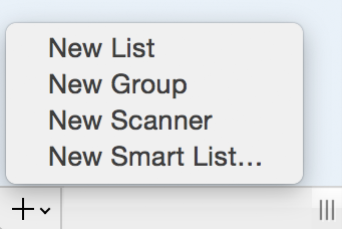
You can configure groups of client machines based on the needs of individual conference rooms, classrooms, etc. To create a new group, click on the ‘+’ button in the bottom left corner of the program, and click ‘New Group’:
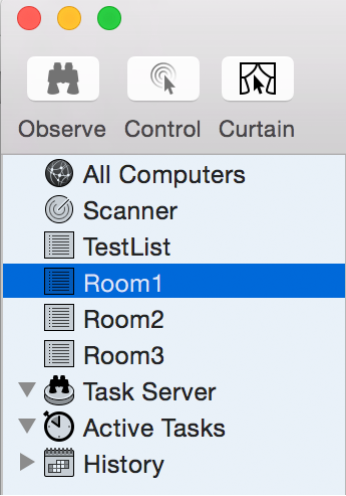
A list of the groups you created will be in the top-left sidebar:
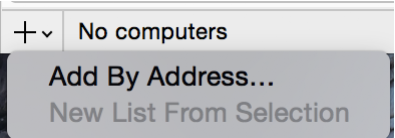
Then, you'll need to add the computers you want to connect to. Click on the second '+' button in the bottom bar:

Then, click 'Add By Address:
Finally, add the information for the computer you want to connect to.
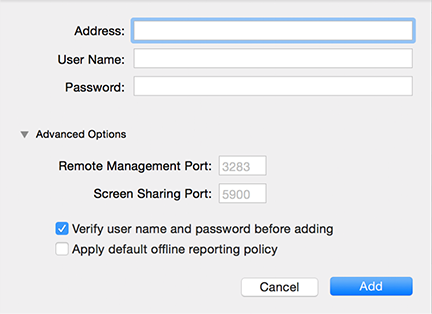
Repeat this process for any subsequent computers you want to add.
Setting the preferences you want to deploy
The recommended way to set the preferences is through the application itself. Open up AirParrot 3, and set the preferences you want to be the default across the computers you are going to deploy to.
Using Automatic workflow to deploy AirParrot 3
Now that you’ve set up the computer groups you want to deploy AirParrot 3 to and configured your preferences, you can use the provided Automator workflow for the deployment. This workflow will handle the copying of the application you want to deploy, as well as your customized preferences. Below is an explanation of what each step in the workflow does:
Get specific finder items
This step gets the files from the host machine that we want to distribute: the application (stored in your Applications folder), and a plist file. The plist contains the preferences you wish to use and is created automatically when you install the application and updated every time a preference is changed.
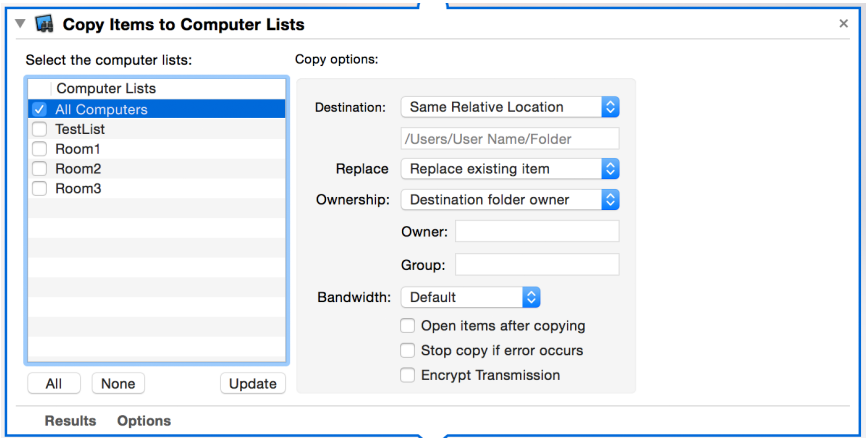
Copy items to computers
This step copies these files to the specified client computers. You don’t need to worry about setting the target file paths; the workflow will take care of this for you automatically. If you’ve changed the items in the ‘Computer Lists’ in Remote Desktop, make sure you click the ‘Update’ button in order to refresh this list.

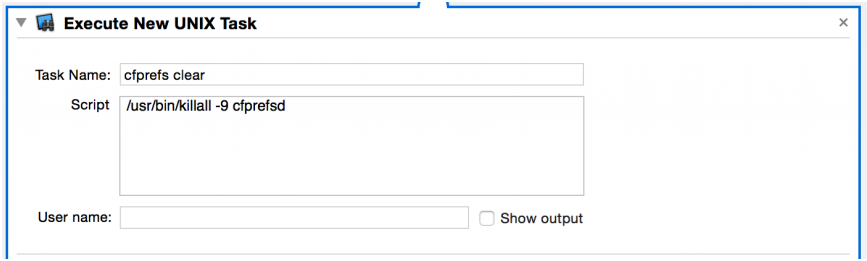
Execute new UNIX Task
In case you already have an instance of AirParrot 3, this script will clear out any existing preferences cache, and the new preferences you want to use will be obeyed.
Running the workflow
To execute the workflow, simply click the ‘Run’ button at the top right corner of Automator:


AirParrot 3 should then be installed on your specified computers with the preferences you set on your machine. If the workflow fails for some reason, you’ll see an alert at the bottom of the program of ‘Workflow failed - error’.
Troubleshooting
There could be a few reasons the workflow failed to properly execute. One potential cause for the error is if you didn’t select any lists to copy the items to in the ‘Copy Items to Computer Lists’:
"No computer lists were selected in the list of computer lists"
This step copies these files to the specified client computers. You don’t need to worry about setting the target file paths; the workflow will take care of this for you automatically. If you’ve changed the items in the ‘Computer Lists’ in Remote Desktop, make sure you click the ‘Update’ button in order to refresh this list.
If that's the case, you'll see an error log similar to the one below:

To resolve this, simply select the list of computers you want to copy to.
“File not found: /Applications/AirParrot 3.app” or
“File not found: /Applications/AirParrot 3.app" or
If you receive a warning similar to the one below:
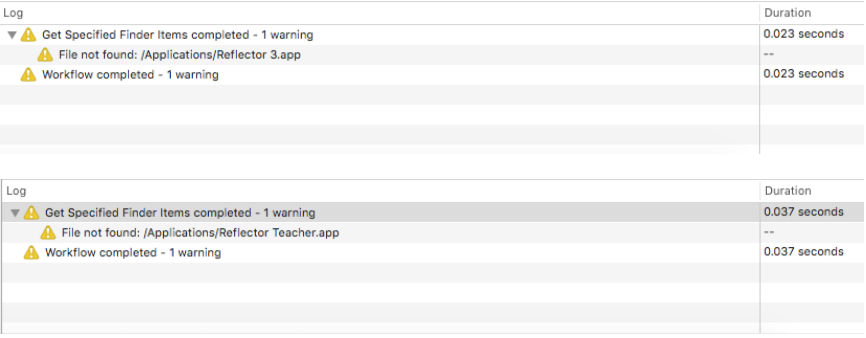
This means that you have AirParrot 3 installed in a location other than the Applications folder. The workflow did not successfully copy and deploy AirParrot 3. To resolve this, make sure AirParrot 3 is installed in the Applications folder.